
Sunny Lemonade Pouch
When life gives you lemons – make a lemon pouch! It will be sure to make someone’s day a little sweeter. This cute and simple lemon pouch is the perfect quick project to make for children or someone sweet in your life.

Supply list
9” all purpose zipper
Fat quarter of outside (yellow) fabric
Fat Quarter of lining fabric
Quarter yard of fusible fleece fabric
1 yard of Para cord or thin rope
Scrap of brown felt
Scrap of green felt
Basic sewing supplies
- Using the templates, start by cutting the pieces for the upper and lower lemon pouch.
- Iron the fusible fleece to the outer bag pieces.
- Starting with the bottom piece, lay the zipper opened face down along the top edge. Make sure the zipper stopper end is lined up with the end of the fabric. The rest of the zipper will be hanging of the end. This will make it easier to sew and we will trim that off later.

- With the matching lining piece facing down, lay the top edge of the lining fabric on top of the zipper. It will make a zipper sandwich.

- Pin or clip the layers together

I am sewing this with my Janome Continental M7 and found this incredibly cool feature to make the zipper process so much easier! Attach foot E.
Touch the T-shirt icon and then scroll until you see the pouch zipper icon – That’s right! There is a pouch zipper icon!
Press the Sew back right side icon and the presser foot and needle will change positions to sew the MOST PERFECT zipper imaginable! It even starts with a little backstitch. This is like Christmas!


Of course, you can simply attach your zipper foot to any machine and do the same – it will still be great!
- Fold the layers back right side out and give them a good press.

- Repeat the previous steps to attach the top of the pouch to the other side of the zipper.


- Are you ready for more fun? Press the Top stitch left side icon and your needle will get into position again to sew a perfectly lined up top stitch.
Top stitch both sides of the zipper.


I like to add a little stitch at both ends of the zipper to hold them together. You can trim the excess zipper, make sure that you don’t accidentally pull the zipper off the teeth with excitement.
- There isn’t a template for the back of the lemon pouch because everyone sews a zipper differently and we want the back to fit perfectly.
Make a sandwich with the outer, lining and fusible fleece all wrong sides together. Lay the finished zipper front with yellow sides facing and cut around to replicate the zippered front.

- Free hand cut a little stem and leaf from your felt colors – I like to sew little veins on my leaf.

- Cut the paracord to the desired length.
- We need to pin everything so it faces inwards, it will all pop out when you turn the lemon right side out.

- Place the front and back right sides together and pin or clip around the edges. Make sure to open the zip some of the way for turning.

- Sew with a 3/8 seam around the entire lemon.

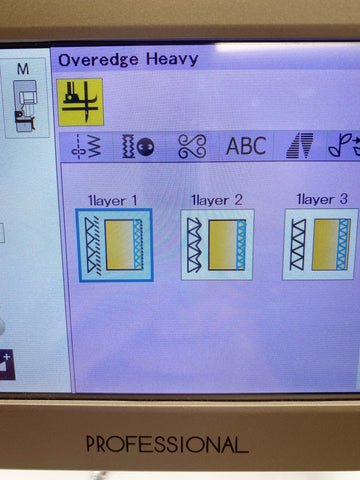
- You could use a serger or zig zag stitch on the raw edges OR you could use my other favorite discovery, The Overedge Heavy icon. It’s a game changer!
Clip on foot M and press T-shirt icon then the Overedge heavy icon. Next press the layer 1 icon. Sew around the raw edge, its mind blowing! It makes the perfect serged edge, super neat and easy.


- Turn everything right side out and give it a good press.
I love this method for creating all different fruit shapes, they make the most perfect gift and you can knock it out in an hour.
Enjoy!
Annabel xx